[DC] NX-OS

  • VDC
  • VPC
  • Fabricpath
  • Fabric Extenders (FEX)
  • OTV

VDC ( Virtual Device Context )

https://www.cisco.com/c/en/us/products/collateral/switches/nexus-7000-10-slot-switch/White_Paper_Tech_Overview_Virtual_Device_Contexts.html

https://www.cisco.com/en/US/docs/switches/datacenter/sw/5_x/nx-os/virtual_device_context/command/reference/vdc_commands.html

A VDC can be used to virtualize the device itself, presenting the physical switch as multiple logical devices. Within that VDC it can contain its own unique and independent set of VLANs and VRFs. Each VDC can have assigned to it physical ports, thus allowing for the hardware data plane to be virtualized as well. Within each VDC, a separate management domain can manage the VDC itself, thus allowing the management plane itself to also be virtualized.

Create a new VDC:

N7k1(config)# vdc N5K1
N7k1(config-vdc)#
N7k1# switchto vdc N5K1

Show allocated interfaces:

switch# show vdc membership

vdc_id: 0 vdc_name: switch interfaces:

        Ethernet2/1           Ethernet2/2           Ethernet2/3
        Ethernet2/4           Ethernet2/5           Ethernet2/6
        Ethernet2/7           Ethernet2/8           Ethernet2/9
        Ethernet2/10          Ethernet2/11          Ethernet2/12
        Ethernet2/13          Ethernet2/14          Ethernet2/15
        Ethernet2/16          Ethernet2/17          Ethernet2/18
        Ethernet2/19          Ethernet2/20          Ethernet2/21
        Ethernet2/22          Ethernet2/23          Ethernet2/24
        Ethernet2/25          Ethernet2/26          Ethernet2/27
        Ethernet2/28          Ethernet2/29          Ethernet2/30
        Ethernet2/31          Ethernet2/32          Ethernet2/33
        Ethernet2/34          Ethernet2/35          Ethernet2/36
        Ethernet2/37          Ethernet2/38          Ethernet2/39
        Ethernet2/40          Ethernet2/41          Ethernet2/42
        Ethernet2/43          Ethernet2/44          Ethernet2/45
        Ethernet2/48

vdc_id: 1 vdc_name: N5K1

        Ethernet2/47

Allocate interfaces:

N7k1(config)#vdc N5K1
N7k1(config-vdc)#allocate interface e2/1 - 12

VPC ( Virtual Port Channel )

https://www.cisco.com/c/en/us/products/collateral/switches/nexus-5000-series-switches/configuration_guide_c07-543563.html

LAB IV ( vPC – virtual Port-channels )

(more…)

[DC] Nexus Models

Nexus 7000/7700Nexus 5500/5600Nexus 2000 ( FEX )
1/10/40/100Gbps1/10/40Gbps1/10/40Gbps Fabric Extender
Layer2 and Layer3 LAN switchingLayer2 and Layer3 LAN switchingNo local switching (Traffic is done by parent)
FCoE SAN SwitchingFCoE SAN Switching
No native FC portsNative FC Ports
Highly redundant
SSO & ISSU

https://www.cisco.com/c/en/us/products/switches/nexus-7000-series-switches/models-comparison.html

https://www.cisco.com/c/en/us/products/switches/nexus-5000-series-switches/models-comparison.html

https://www.cisco.com/c/en/us/products/switches/nexus-2000-series-fabric-extenders/models-comparison.html

LAB VII: BGP communities

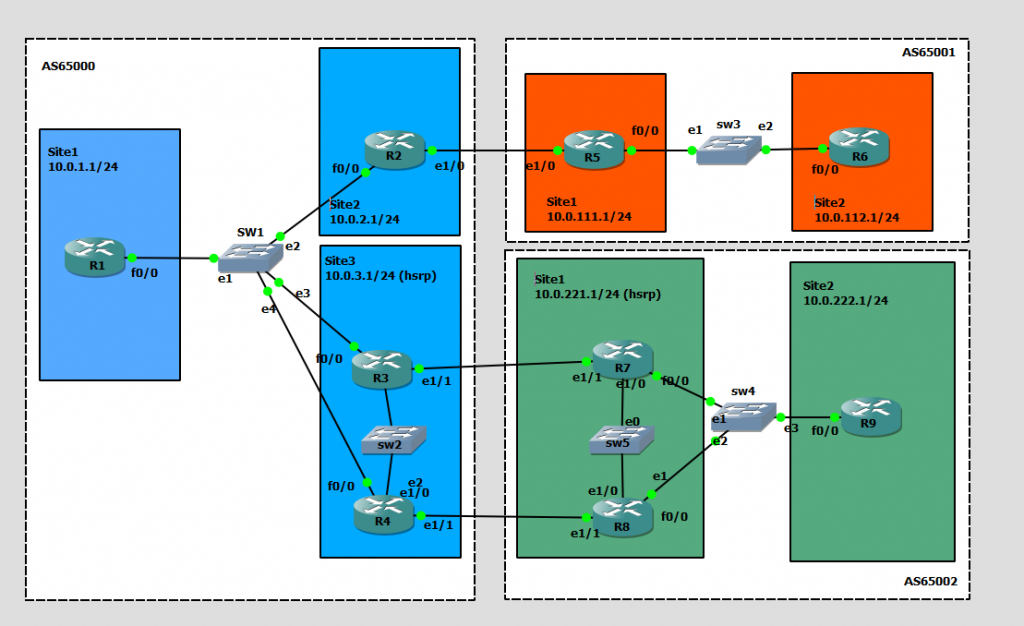
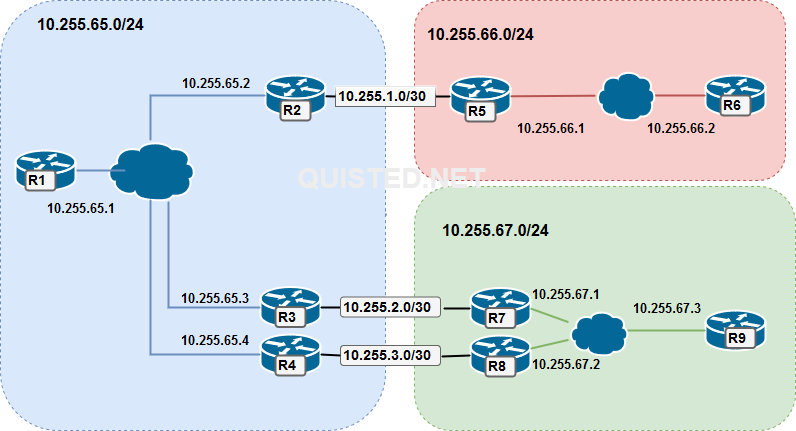
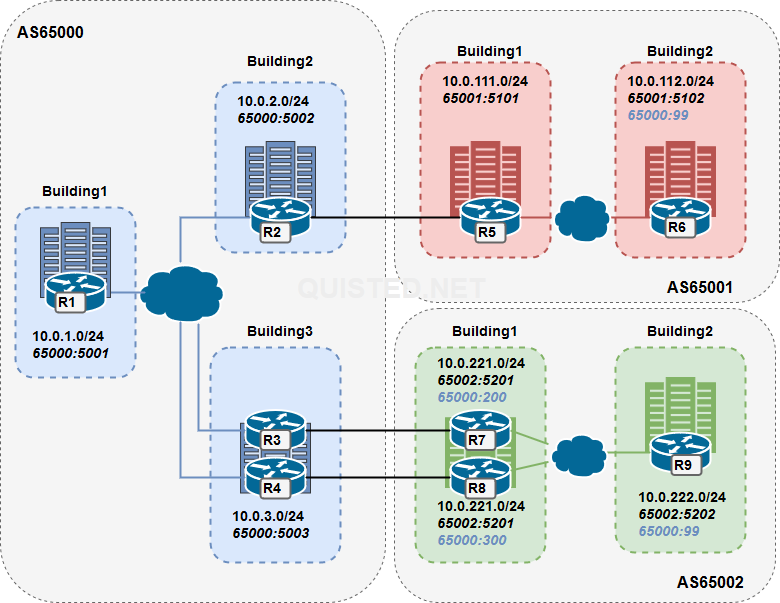
Building a case study from the ARCH FLG book; BGP communities.

The idea is to use BGP communities to influence the routing between Autonomous Systems with the following goals in mind:

  • Configure communities to tag the routes per building on each AS.
  • Configure communities as no-export so the routes of AS65001.building2 and AS65002.building2 are not exported through AS65000.
    • The routes will be tagged on R6 and R9 with community 65000:99 and processed on the AS boundry.
    • The routes of AS65001.building1 and AS65002.building1 are allowed to be exported.
  • Configure communities so that R7 and R8 can set their local preference on the AS65000 side.
    • The routes will be tagged on R7 will be tagged with 65000:200 resulting in a local-preference of 200.
    • The routes will be tagged on R8 will be tagged with 65000:300 resulting in a local-preference of 300.
ASBuildingSubnetCommunityDescription
AS65000Building 1 ( Router 1 )10.0.1.0/2465000:5001
AS65000Building 2 ( Router 2 )10.0.2.0/2465000:5002Single uplink to AS65001
AS65000Building 3 ( Router 3 )10.0.3.0/2465000:5003Double uplink to AS65002
AS65000Building 3 ( Router 4 )10.0.3.0/2465000:5003Double uplink to AS65002
AS65001Building 1 ( Router 5 )10.0.111.0/2465001:5102
AS65001Building 2 ( Router 6 )10.0.112.0/2465001:5102
65000:99
Community 65000:99 is used for no-export
AS65002Building 1 ( Router 7 )10.0.221.0/2465002:5202
65000:200
65000:200 is used for local preference 200 in AS65000
AS65002Building 1 ( Router 8 )10.0.221.0/2465002:5201
65000:300
65000:300 is used for local preference 300 in AS65000
AS65002Building 3 ( Router 9 )10.0.222.0/2465002:5202
65000:99
Community 65000:99 is used for no-export

LAB:

LAYER3:


BGP Configuration:

AS65000 :

R1# (Change the network and neighbor addresses where needed for the other routers)
router bgp 65000
 bgp log-neighbor-changes
 network 10.0.1.0 mask 255.255.255.0
 neighbor ibgp peer-group
 neighbor ibgp remote-as 65000
 neighbor ibgp next-hop-self
 neighbor ibgp send-community
 neighbor ibgp soft-reconfiguration inbound
 neighbor 10.255.65.2 peer-group ibgp
 neighbor 10.255.65.3 peer-group ibgp
 neighbor 10.255.65.4 peer-group ibgp

AS65001 :

R5# (Change the network and neighbor addresses where needed for the other routers)
router bgp 65001
 bgp log-neighbor-changes
 network 10.0.111.0 mask 255.255.255.0
 neighbor ibgp peer-group
 neighbor ibgp remote-as 65001
 neighbor ibgp next-hop-self
 neighbor ibgp send-community
 neighbor ibgp soft-reconfiguration inbound
 neighbor 10.255.1.1 remote-as 65000
 neighbor 10.255.1.1 send-community
 neighbor 10.255.66.2 peer-group ibgp

AS65002 :

R7# (Change the network and neighbor addresses where needed for the other routers)
router bgp 65002
 bgp log-neighbor-changes
 network 10.0.221.0 mask 255.255.255.0
 neighbor ibgp peer-group
 neighbor ibgp remote-as 65002
 neighbor ibgp next-hop-self
 neighbor ibgp send-community
 neighbor ibgp soft-reconfiguration inbound
 neighbor 10.255.2.1 remote-as 65000
 neighbor 10.255.2.1 send-community
 neighbor 10.255.2.1 route-map EBGP-MAP out
 neighbor 10.255.67.2 peer-group ibgp
 neighbor 10.255.67.3 peer-group ibgp

Tagging routes on R6 and R9 (no export)

R9#:
access-list 101 permit ip host 10.0.222.0 host 255.255.255.0
!
route-map TAGROUTE permit 10     
 match ip address 101                    # MATCH THE ROUTES YOU WANT TO TAG
 set community 65000:99 65002:5202       # SET COMMUNITIES 65000:99 (no export) and 65000:5202 ( site ID) 

Router bgp 65002
- snip -
neighbor ibgp route-map TAGROUTE out     # APPLY ROUTEMAP ON OUTGOING ROUTES TOWARDS R7 + R8 
- snap - 

Verify on R7 and R8:

R7#sh ip bgp 10.0.222.0
BGP routing table entry for 10.0.222.0/24, version 3
Paths: (1 available, best #1, table default)
  Advertised to update-groups:
     9
  Refresh Epoch 1
  Local, (received & used)
    10.255.67.3 from 10.255.67.3 (10.0.222.1)
      Origin IGP, metric 0, localpref 100, valid, internal, best
      Community: 65000:99 65002:5202
      rx pathid: 0, tx pathid: 0x0


Confuring communities on R7 and R8 ( Site-ID’s and Local pref community )

R7:
access-list 101 permit ip host 10.0.221.0 host 255.255.255.0
!
route-map EBGP-MAP permit 10
 match ip address 101
 set community 65000:200 65002:5101
!
route-map EBGP-MAP permit 20
!
Router bgp 65002:
neighbor 10.255.2.1 route-map EBGP-MAP out

R8:
access-list 101 permit ip host 10.0.221.0 host 255.255.255.0
!
route-map EBGP-MAP permit 10
 match ip address 101
 set community 65000:300 65002:5101
!
route-map EBGP-MAP permit 20
!
Router bgp 65002:
neighbor 10.255.3.1 route-map EBGP-MAP out

What this will accomplish is that a local pref community is send to AS65000 with resulting values of 200 for R7 and 300 for R8 for the 10.0.221.0/24 route.

Confuring the community settings on R3 and R4 ( No export and Local pref )

R3# and R4#:
ip community-list 1 permit 65000:99        # The no-export community from R6 and R9 
ip community-list 2 permit 65000:200       # The localpref community for value 200
ip community-list 3 permit 65000:300       # The localpref community for value 300
!
route-map TAG-IN permit 10
 match community 1
 set community no-export
!
route-map TAG-IN permit 20
 match community 2
 set local-preference 200
!
route-map TAG-IN permit 30
 match community 3
 set local-preference 300
!
route-map TAG-IN permit 40                  # This to allow all other routes if there were any.

router bgp 65000
 neighbor 10.255.3.2 route-map TAG-IN in

This will give R4 a higher local pref (300) for route 10.0.221.0/24 towards R8. Resulting in the following result from R3’s prespective:

R3#sh ip route 10.0.221.1
Routing entry for 10.0.221.0/24
  Known via "bgp 65000", distance 200, metric 0
  Tag 65002, type internal
  Last update from 10.255.65.4 03:51:18 ago
  Routing Descriptor Blocks:
  * 10.255.65.4, from 10.255.65.4, 03:51:18 ago        # R4 is the next hop
      Route metric is 0, traffic share count is 1
      AS Hops 1
      Route tag 65002
      MPLS label: none


R3#sh ip bgp 10.0.221.0
BGP routing table entry for 10.0.221.0/24, version 7
Paths: (2 available, best #1, table default)
  Advertised to update-groups:
     9
  Refresh Epoch 1
  65002, (received & used)
    10.255.65.4 from 10.255.65.4 (10.255.65.4)
      Origin IGP, metric 0, localpref 300, valid, internal, best
      Community: 65000:300 65002:5101
      rx pathid: 0, tx pathid: 0x0
  Refresh Epoch 1
  65002
    10.255.2.2 from 10.255.2.2 (10.255.67.1)
      Origin IGP, metric 0, localpref 200, valid, external
      Community: 65000:200 65002:5101
      rx pathid: 0, tx pathid: 0

Verifying the no-export community

If all goes well we shouldn’t see the 10.0.112.0/24 and 10.0.222.0/24 routes exported through AS65000 ( And we don’t );

R1#sh ip route
-
      10.0.0.0/8 is variably subnetted, 10 subnets, 2 masks
C        10.0.1.0/24 is directly connected, Loopback0
L        10.0.1.1/32 is directly connected, Loopback0
B        10.0.2.0/24 [200/0] via 10.255.65.2, 03:36:08
B        10.0.3.0/24 [200/0] via 10.255.65.3, 03:36:07
B        10.0.111.0/24 [200/0] via 10.255.65.2, 03:36:08
B        10.0.112.0/24 [200/0] via 10.255.65.2, 03:36:08        #AS6500 Sees the AS65001 route
B        10.0.221.0/24 [200/0] via 10.255.65.4, 03:36:07
B        10.0.222.0/24 [200/0] via 10.255.65.3, 03:36:07        #AS6500 Sees the AS65002 route
C        10.255.65.0/24 is directly connected, FastEthernet0/0
L        10.255.65.1/32 is directly connected, FastEthernet0/0

R6#sh ip route
      10.0.0.0/8 is variably subnetted, 9 subnets, 2 masks
B        10.0.1.0/24 [200/0] via 10.255.66.1, 03:37:08
B        10.0.2.0/24 [200/0] via 10.255.66.1, 03:37:08
B        10.0.3.0/24 [200/0] via 10.255.66.1, 03:36:39
B        10.0.111.0/24 [200/0] via 10.255.66.1, 00:00:03
C        10.0.112.0/24 is directly connected, Loopback0
L        10.0.112.1/32 is directly connected, Loopback0
B        10.0.221.0/24 [200/0] via 10.255.66.1, 03:36:39
C        10.255.66.0/24 is directly connected, FastEthernet0/0
L        10.255.66.2/32 is directly connected, FastEthernet0/0
                                                          #AS65001 is missing the 10.0.222.0/24 route

R9#sh ip route
      10.0.0.0/8 is variably subnetted, 9 subnets, 2 masks
B        10.0.1.0/24 [200/0] via 10.255.67.1, 03:34:29
B        10.0.2.0/24 [200/0] via 10.255.67.1, 03:34:29
B        10.0.3.0/24 [200/0] via 10.255.67.1, 03:34:29
B        10.0.111.0/24 [200/0] via 10.255.67.1, 03:34:29
B        10.0.221.0/24 [200/0] via 10.255.67.1, 03:41:11
C        10.0.222.0/24 is directly connected, Loopback0
L        10.0.222.1/32 is directly connected, Loopback0
C        10.255.67.0/24 is directly connected, FastEthernet0/0
L        10.255.67.3/32 is directly connected, FastEthernet0/0
                                                         #AS65002 is missing the 10.0.112.0/24 route

Starting CCNA: Datacenter

Next up, Datacenter!

200-150

  • Data Center Physical Infrastructure
  • Basic Data Center Networking Concepts
  • Advanced Data Center Networking Concepts
  • Basic Data Center Storage
  • Advanced Data Center Storage

https://learningcontent.cisco.com/cln_storage/text/cln/marketing/exam-topics/200-150-dcicn.pdf

200-155

  • Unified Computing
  • Network Virtualization
  • Cisco Data Center Networking Technologies
  • Automation and Orchestration
  • Application Centric Infrastructure

https://learningcontent.cisco.com/cln_storage/text/cln/marketing/exam-topics/200-155-dcict.pdf

LAB VI: Multicast PIM Sparse mode

https://en.wikipedia.org/wiki/Protocol_Independent_Multicast

  • PIM Sparse Mode (PIM-SM) explicitly builds unidirectional shared trees rooted at a rendezvous point (RP) per group, and optionally creates shortest-path trees per source. PIM-SM generally scales fairly well for wide-area usage.

Packetcapture when generating traffic from the Video Server (R1) to the multicast group address 224.3.2.1.

Connectivity via OSPF:

On all routers:
router ospf 1
 network 0.0.0.0 255.255.255.255 area 0

R1#sh ip route
Codes: C - connected, S - static, R - RIP, M - mobile, B - BGP
       D - EIGRP, EX - EIGRP external, O - OSPF, IA - OSPF inter area
       N1 - OSPF NSSA external type 1, N2 - OSPF NSSA external type 2
       E1 - OSPF external type 1, E2 - OSPF external type 2
       i - IS-IS, su - IS-IS summary, L1 - IS-IS level-1, L2 - IS-IS level-2
       ia - IS-IS inter area, * - candidate default, U - per-user static route
       o - ODR, P - periodic downloaded static route

Gateway of last resort is not set

     1.0.0.0/32 is subnetted, 1 subnets
O       1.1.1.1 [110/21] via 10.0.0.2, 00:14:46, FastEthernet0/0
     20.0.0.0/24 is subnetted, 1 subnets
O       20.0.0.0 [110/20] via 10.0.0.2, 00:14:46, FastEthernet0/0
     10.0.0.0/24 is subnetted, 1 subnets
C       10.0.0.0 is directly connected, FastEthernet0/0
     30.0.0.0/24 is subnetted, 1 subnets
O       30.0.0.0 [110/30] via 10.0.0.2, 00:14:46, FastEthernet0/0

Multicast configuration:

On all routers:
# Enable Multicast routing
ip multicast-routing

#Enable PIM Sparse-mode on the interfaces
R1(config)#int fa0/0
R1(config-if)#ip pim sparse-mode
R1(config)#int fa0/1
R1(config-if)#ip pim sparse-mode

#Add RP address
ip pim rp-address 1.1.1.1

(more…)

300-320 ARCH resource list

Designing for Cisco Network Service Architectures (ARCH) Foundation Learning Guide: CCDP ARCH 300-320, 4th Edition:

CCDP 300-320 videos courses:

Cisco Design Webinars:

Cisco Arch Study Material:

Cisco Design Zone:

https://www.cisco.com/c/en/us/solutions/design-zone.html#~stickynav=3

Books / PDF

Videos:

Cisco Guides:

Various Resources:

Cisco Live:

  • Enterprise Campus Design: Multilayer Architectures and Design Principles – BRKCRS-2031
  • WAN Architectures and Design Principles – BRKRST-2041
  • Campus Wired LAN Deployment Using Cisco Validated Designs – BRKCRS-1500
  • Campus QoS Design-Simplified – BRKCRS-2501
  • OSPF Deployment in Modern Networks – BRKRST-2337
  • EIGRP Deployment in Modern Networks – BRKRST-2336
  • Advanced – Scaling BGP – BRKRST-3321
  • Nexus Multicast Design Best Practices – BRKIPM-3062
  • Cisco FabricPath Technology and Design – BRKDCT-2081
  • Advanced Enterprise Campus Design: Converged Access – BRKCRS-2888
  • Cisco Unified Contact Center Enterprise Planning and Design – BRKCCT-2007


Lab V ( Nexus7k, Overlay Transport Virtualization )

OTV: Overlay Transport Virtualization

OTV(Overlay Transport Virtualization) is a technology that provide layer2 extension capabilities between different data centers.
I
n its most simplest form OTV is a new DCI (Data Center Interconnect) technology that routes MAC-based information by encapsulating traffic in normal IP packets for transit.

  • Transparent workload mobility
  • Business resiliency
  • Superior computing resource efficiencies
DescriptionConfig
Overlay InterfaceLogical OTV Tunnel interfaceinterface Overlay1
OTV Join InterfaceThe physical link or port-channel that you use to route upstream towards the datacenter interconnectotv join-interface Ethernet2/1
OTV Control GroupMulticast address used to discover the remote sites in the control plane.otv control-group 224.100.100.100
OTV Data GroupUsed for tunneling multicast traffic over the OTV in the dataplaneotv data-group 232.1.2.0/24
Extend VLANsVLANs that will be tunneled over OTV.otv extend-vlan 100
Site VLANUsed to synchronize the Authoritative Edge Device (AED) role within an OTV site. otv site-vlan 999
Site IdentifierShould be unique per Datacenter. Used in AED Election.otv site-identifier 0x1

References:

Cisco: OTV Quick Start Guide

Cisco: NX-OS OTV Configuration Guide

Cisco: OTV Best Practices

Cisco: OTV Whitepaper

OTV Encapsulation

OTV adds a further 42 bytes on all packets traveling across the overlay network. The OTV Edge device removes the CRC and 802.1Q fields from the original Layer2 frame. It then adds an OTV Shim Header which includes this 802.1Q field (this includes the priority P-bit value) and the Overlay ID information. It also includes an external IP header for the transport network. All OTV packets have Don’t Fragment (DF) bit set to 1 in the external IP header.

(more…)

LAB IV ( vPC – virtual Port-channels )

ComponentDescription
vPC Domain Includes the vPC Peers, KeepAlive Links and the PortChannels that use the vPC technology.
vPC Peer SwitchThe other switch within the vPC domain. Each switch is connected via the vPC peer link. Its also worth noting that one device is selected as primary and the other secondary.
vPC Member PortPorts included within the vPCs.
vPC Peer Keepalive LinkConnects both vPC peer switches and carries monitoring traffic to/from each peer switch. Monitoring is performed to ensures the switch(s) is both operational and running vPC.
vPC Peer LinkConnects both vPC peer switches. And carries BPDUs, HSRPs, and MAC addresses to its vPC peer. In the event of vPC member port failure it also carries unicast traffic to the peer switch.
Orphan PortAn orphan port is a port that is configured with a vPC VLAN (i.e a VLAN that is carried over the vPC peer link) and is not configured as a vPC member port.

A virtual PortChannel (vPC) allows links that are physically connected to two different Cisco Nexus™ 5000 Series devices to appear as a single PortChannel to a third device. The third device can be a Cisco Nexus 2000 Series Fabric Extender or a switch, server, or any other networking device. A vPC can provide Layer 2 multipathing, which allows you to create redundancy by increasing bandwidth, enabling multiple parallel paths between nodes and load-balancing traffic where alternative paths exist.

After you enable the vPC function, you create a peer keepalive link, which sends heartbeat messages between the two vPC peer devices.

The vPC domain includes both vPC peer devices, the vPC peer keepalive link, the vPC peer link, and all the PortChannels in the vPC domain connected to the downstream device. You can have only one vPC domain ID on each device.

(more…)

LAB III ( DMVPN, MGRE, NHRP, EIGRP)

The Next Hop Resolution Protocol (NHRP) is an Address Resolution Protocol (ARP)-like protocol that dynamically maps a Non-Broadcast Multi-Access (NBMA) network. With NHRP, systems attached to an NBMA network can dynamically learn the NBMA (physical) address of the other systems that are part of that network, allowing these systems to directly communicate.

NHRP is a client and server protocol where the hub is the Next Hop Server (NHS) and the spokes are the Next Hop Clients (NHCs). The hub maintains an NHRP database of the public interface addresses of each spoke. Each spoke registers its real address when it boots and queries the NHRP database for real addresses of the destination spokes to build direct tunnels.

https://www.cisco.com/c/en/us/td/docs/ios-xml/ios/ipaddr_nhrp/configuration/xe-16/nhrp-xe-16-book/config-nhrp.html

HUB (R1 ):

R1: 
interface FastEthernet0/0
 ip address 192.168.1.100 255.255.255.0
 duplex full

interface Tunnel0
 ip address 10.1.1.1 255.255.255.0  #TUNNEL CONFIG
 no ip redirects
 ip mtu 1416
 ip hold-time eigrp 1 35         #EIGRP CONFIG
 no ip next-hop-self eigrp 1     #EIGRP CONFIG
 no ip split-horizon eigrp 1     #EIGRP CONFIG
 ip nhrp map multicast dynamic   #NHRP CONFIG 
 ip nhrp network-id 1            #NHRP CONFIG 
 tunnel source 192.168.1.100     #TUNNEL CONFIG
 tunnel mode gre multipoint      #TUNNEL CONFIG
!
router eigrp 1
 network 10.0.0.0
 network 172.16.0.0
 network 192.168.0.0
!
ip route 0.0.0.0 0.0.0.0 192.168.1.1  #ROUTING TO R2-INTERNET

(more…)

LAB II ( Dual-Homed BGP, HSRP, Linkstate tracking )

Setup:

  • Dual-homed BGP between AS100 and AS200
  • AS100
    • HSRP 192.168.0.10 between R1 and R2
    • Router 1 HSRP Master
    • Linkstate tracking on Fa0/0
    • EIGRP as IGP
  • AS200
    • HSRP 10.10.10.10 between R3 and R4
    • Router 3 as HSRP Master
    • Linkstate tracking on Fa0/0
    • OSPF for IGP

Scenario: The link between Router1 and Router3 would fail. Linkstate tracking would decrement the HSRP priority and switch masters.

When the link was restored and using default HSRP timers, the HSRP master would switch back before the BGP session was established between Router1 and Router3 (at least in GNS3).
Setting up delay timers and linkstate tracking would allow for a good recovery.

(more…)