SD-Access under the hood; Locator/ID Separation Protocol (LISP)
When it comes to Cisco’s software-defined access (SD-Access), one of the key technologies working behind the scenes is Locator/ID Separation Protocol (LISP). At first glance, LISP might seem like just another routing protocol, but it plays a much bigger role. It fundamentally changes how network addressing works by decoupling identity from location. This separation is especially important in SD-Access environments, where flexibility, scalability, and mobility are critical.
In this article, I willbreak down the funadementals of LISP, the core components that make up its architecture, and how it fits into the SD-Access framework. Whether you’re managing campus networks or diving into next-gen network design, understanding LISP is essential to grasp how SD-Access delivers secure, automated, and policy-driven access.
Cisco Live has been on my bucket list for a many years. I heard the stories, watched the streams and VODs and wondered what the event would be like in person. This year Routz facilitated the opportunity and together with a couple colleagues I was able to attend Cisco Live EMEA 2025 in Amsterdam. My focus from a technology perspective was on SD-Access, Catalyst Center, Service Provider Technologies, Segment Routing, Multi-Domain Segmentation and IPv6.
Cisco Champions
Being part of the Cisco Champions made the experience even better because I was able to meet people from our community in person. I got to talk to Champions from America, Iceland, Azerbaijan, Germany, Sweden and many more countries from all over the world. The Cisco Champions gave us access to behind-the-scenes tours before the event started, whisper sessions on many topics and domains, and feedback session with Bonny Shapira who is charge of planning Cisco Live EMEA.
Intermediate System to Intermediate System (IS-IS)
Intermediate System to Intermediate System (IS-IS) is a dynamic link-state routing protocol widely used in large-scale networks, especially in service provider environments. In this post I will look at the following IS-IS configurations;
Redistribution of OSPF into IS-IS, and the differences between L1 and L2.
IS-IS Path selection when L1 and L2 routes are available.
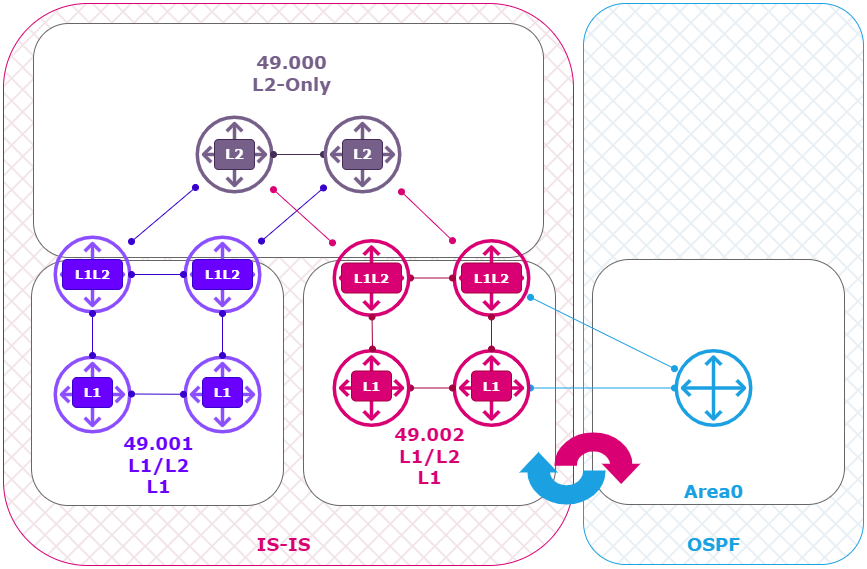
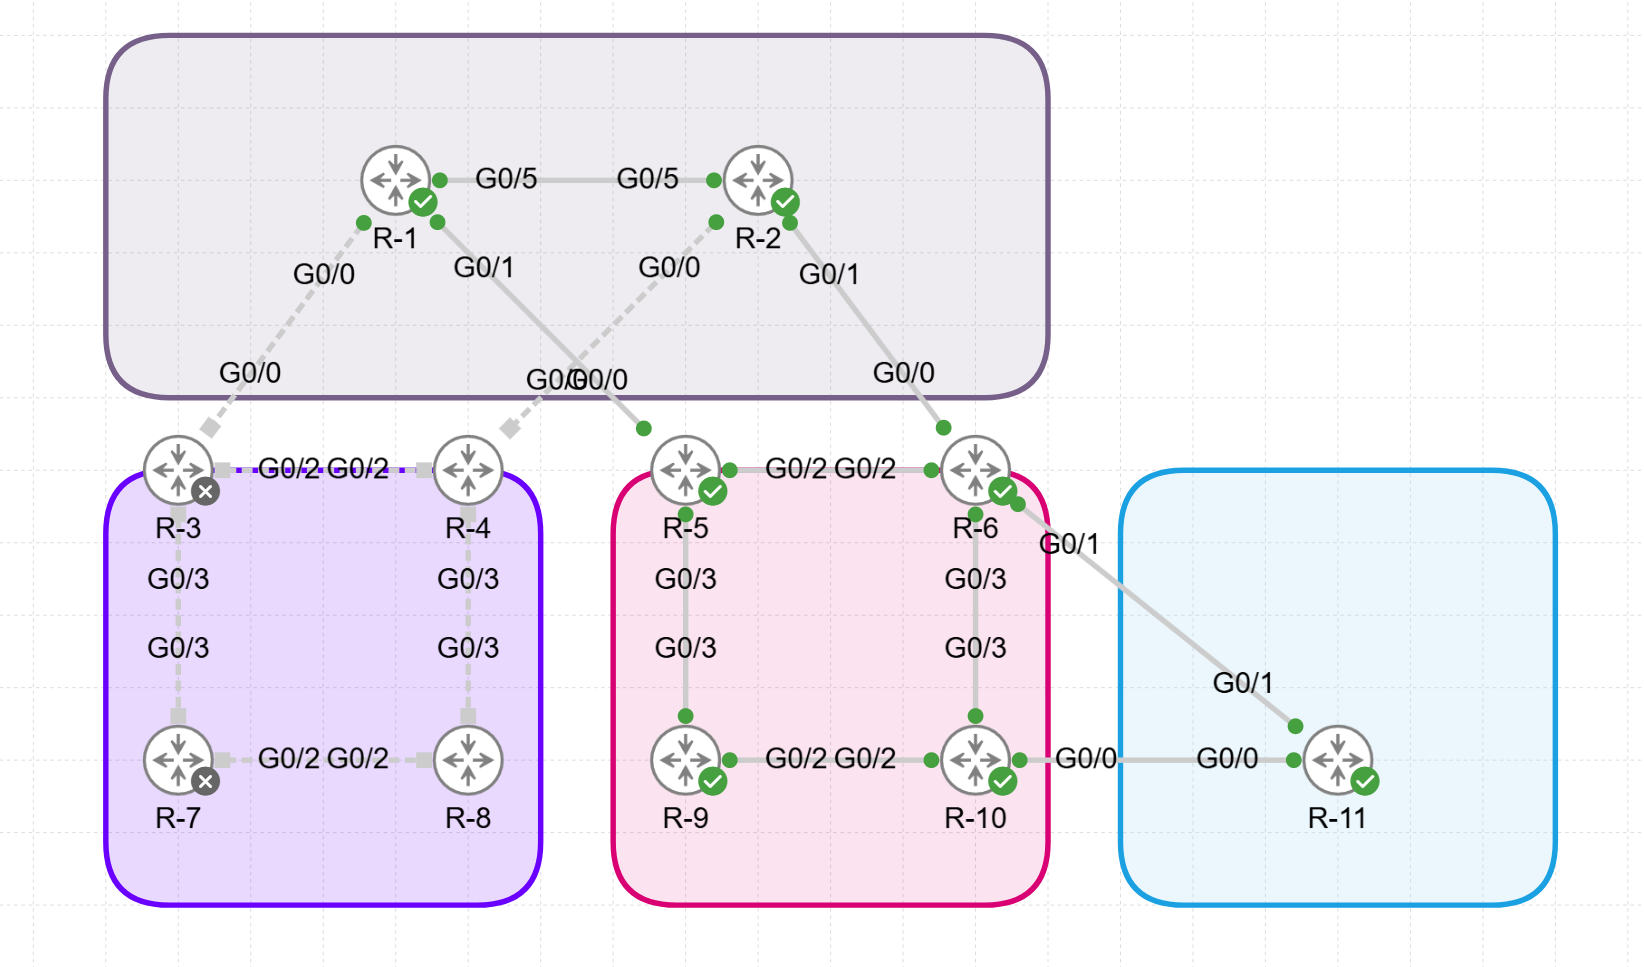
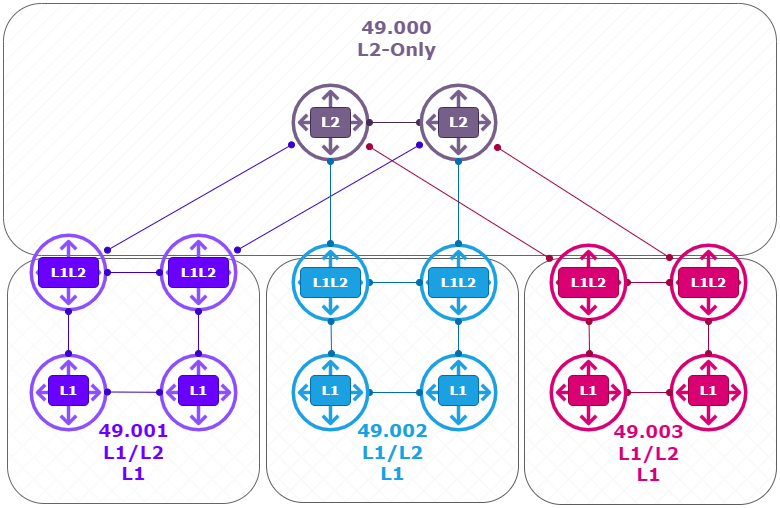
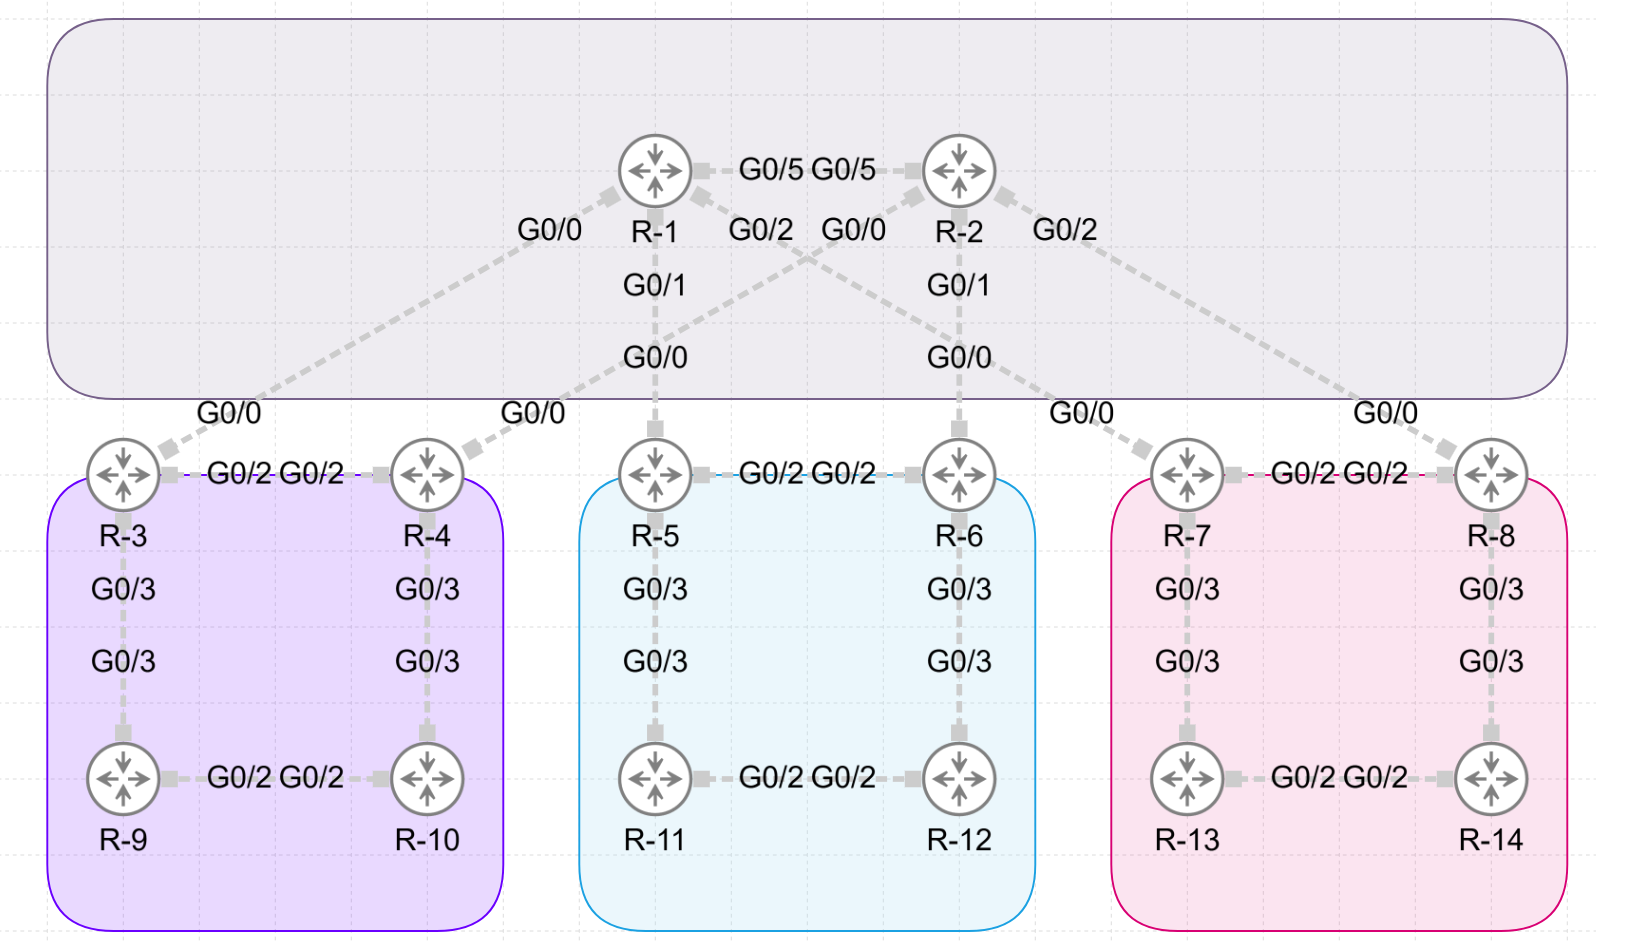
Intermediate System to Intermediate System (IS-IS)
Intermediate System to Intermediate System (IS-IS) is a dynamic link-state routing protocol widely used in large-scale networks, especially in service provider environments. One of its features is interlevel routing, which allows communication between IS-IS levels (Level 1 and Level 2). This post explains IS-IS interlevel routing and provides configuration examples to implement it in practical scenarios.
Cisco Modeling Labs (CML) is a powerful, scalable network simulation platform that enables network engineers, IT administrators, and developers to design, build, and test networks in a controlled environment. The latest version, Cisco Modeling Labs 2.7, introduces new features and enhancements, including an improved REST API that enables seamless automation and integration. In this article, we’ll discuss how to get started with CML 2.7 and use Postman to interact with its API for network automation tasks.
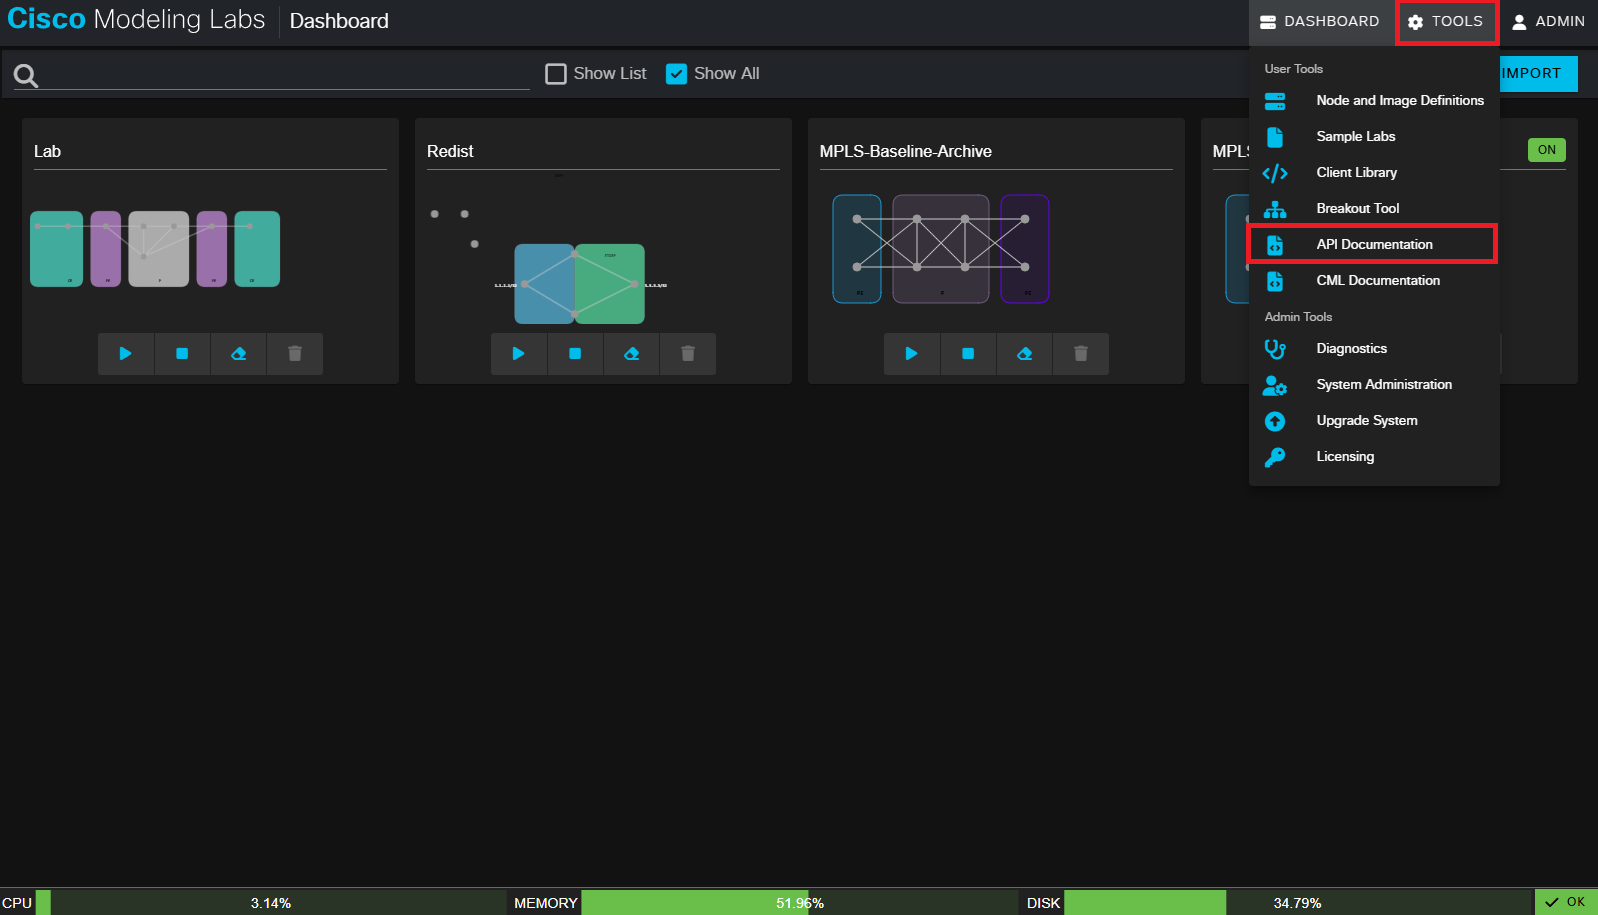
CML API Documentation
Log in to Cisco Modeling Labs: Go to the CML web interface, typically accessed via your browser.
Find API Documentation: CML’s built-in documentation is available under Help > API Documentation. This provides detailed information on available API endpoints, request formats, and expected responses.
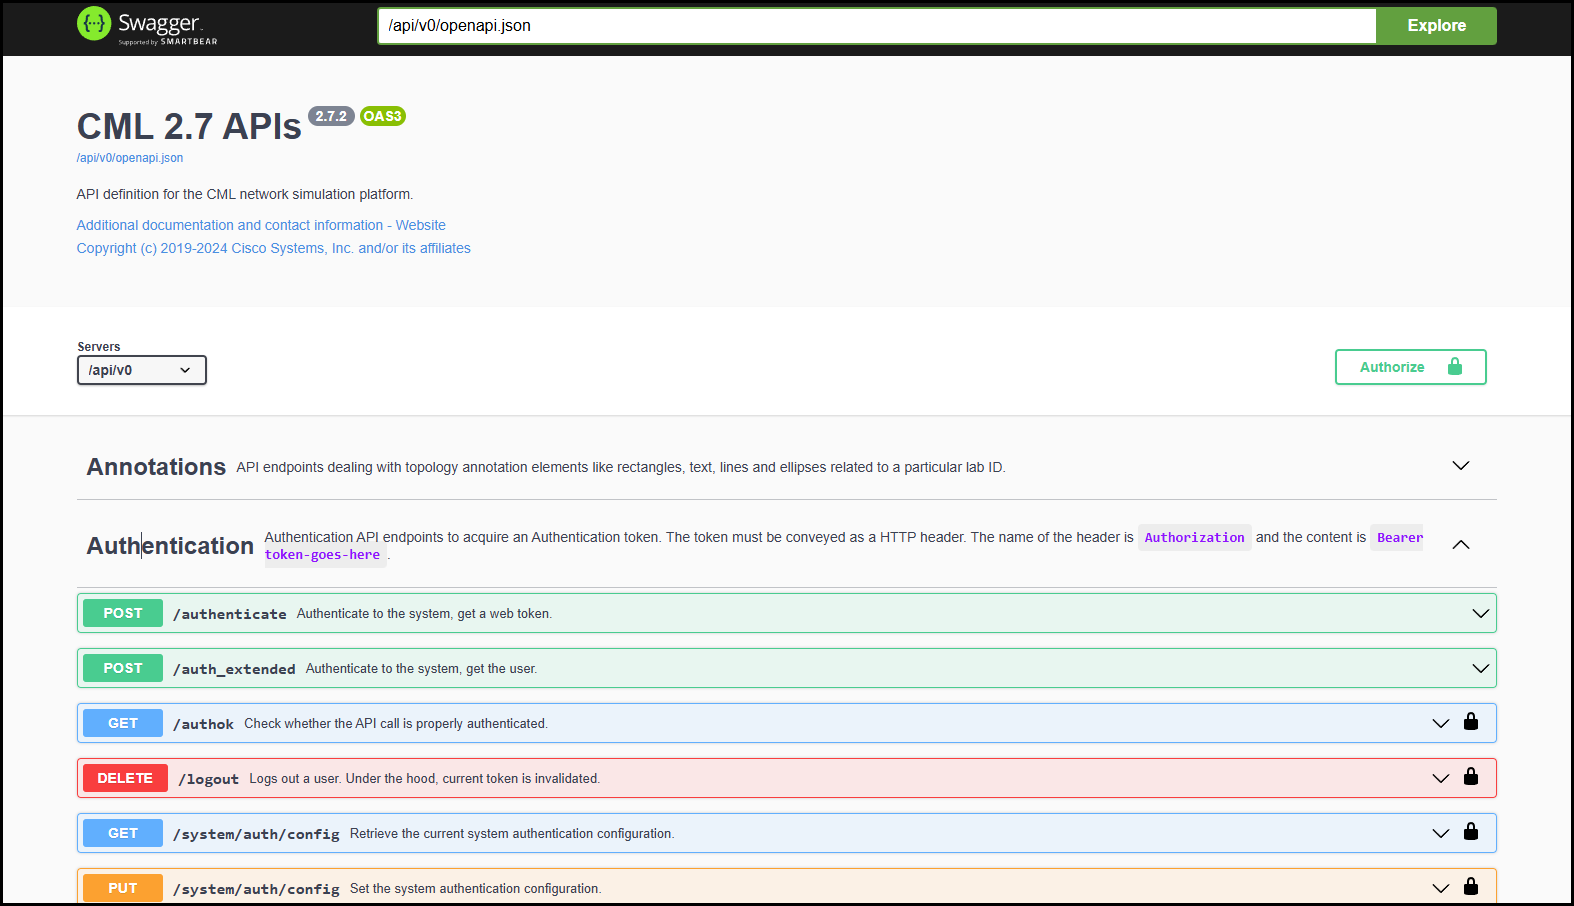
A new page will open with the documentation:
Here you can find all the information on the available CML API calls that you might need.
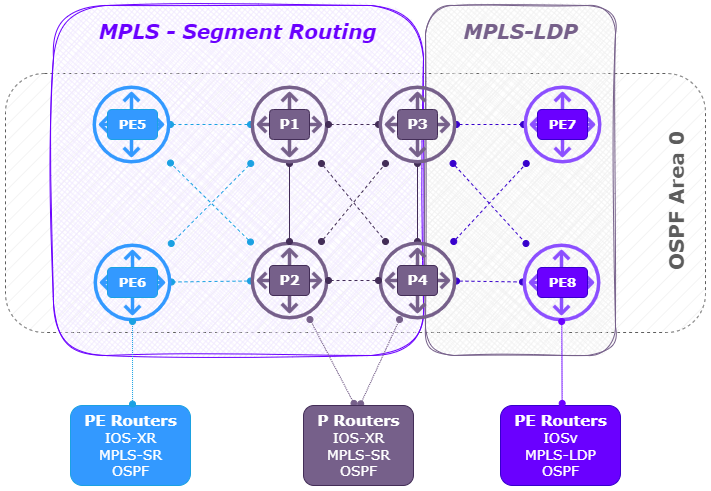
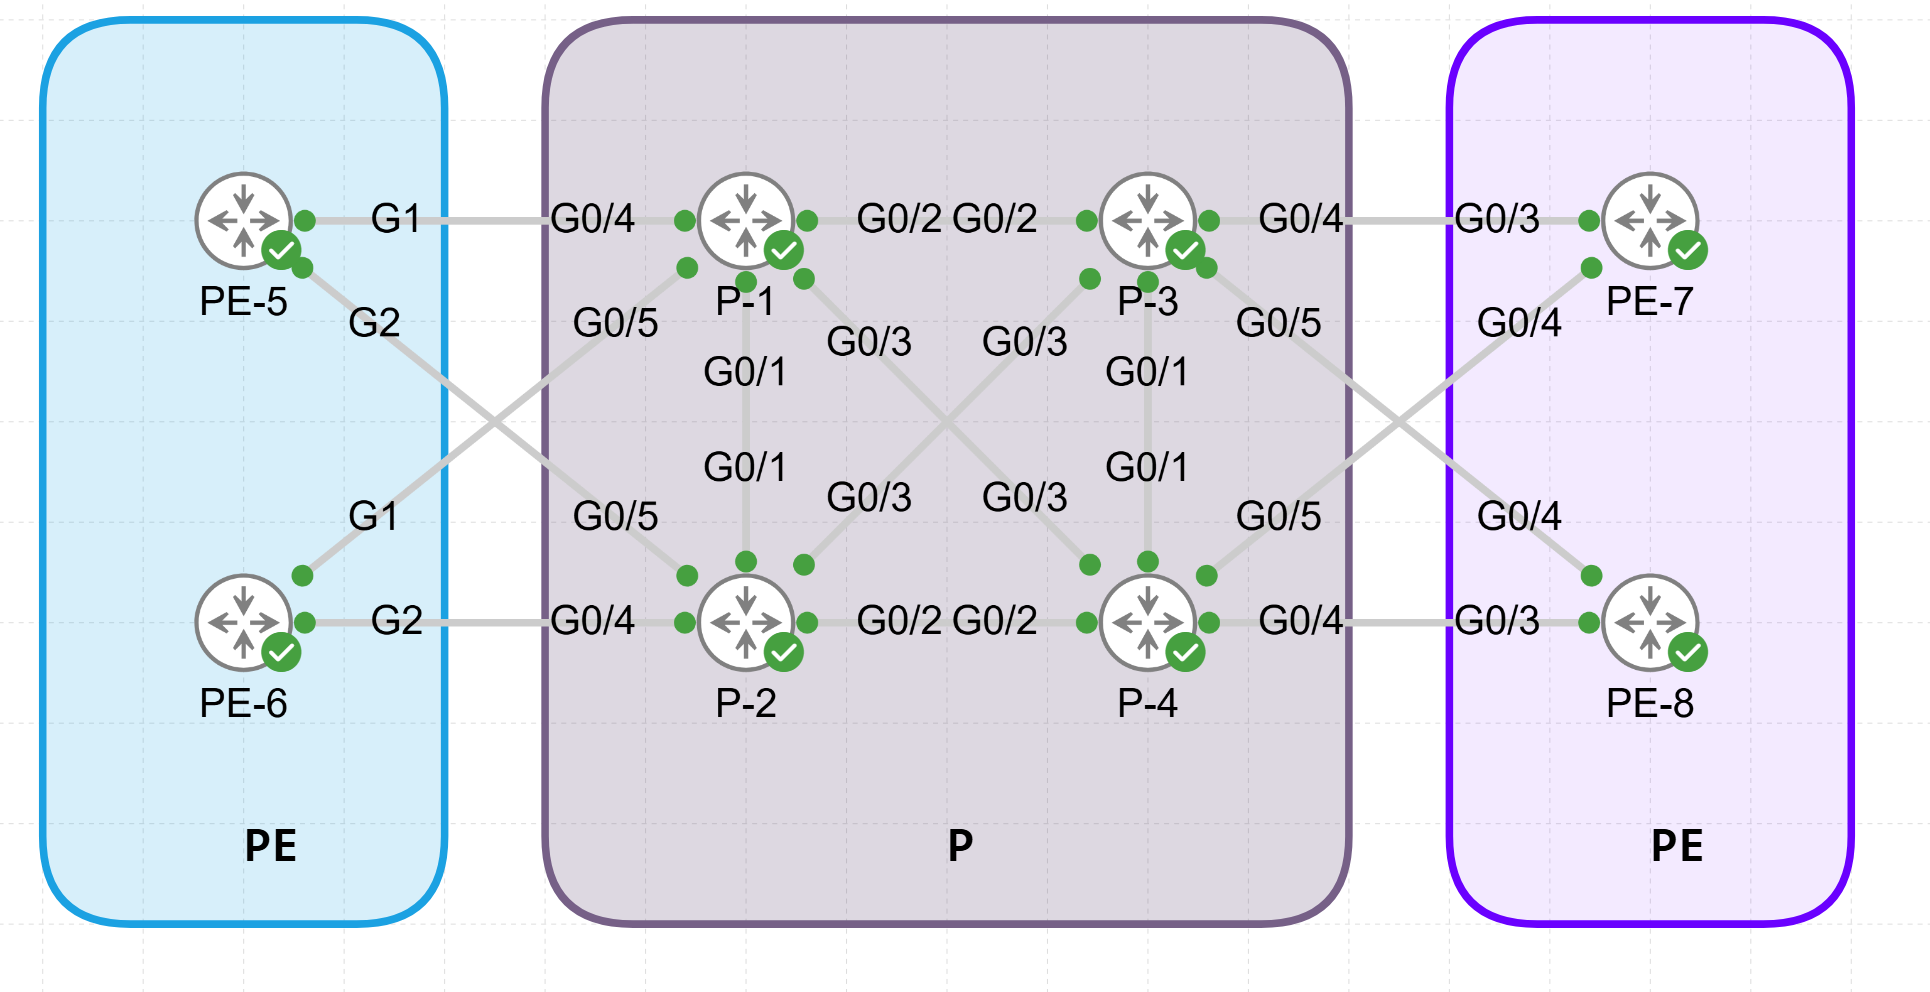
In an MPLS network with Segment Routing (SR), ensuring rapid recovery from link or node failures is crucial for maintaining high network availability. Cisco’s IOS-XR supports various Fast Reroute (FRR) mechanisms within MPLS Segment Routing environments, including Link Protection, Node Protection, and Topology Independent Loop-Free Alternate (TI-LFA). This article will provide a configuration guide and explanations for these MPLS-SR FRR mechanisms in an MPLS SR-enabled network running OSPF as the Interior Gateway Protocol (IGP).
What is TI-LFA in an MPLS network?
TI-LFA (Topology-Independent Loop-Free Alternate) is a fast reroute (FRR) mechanism in MPLS Segment Routing (MPLS-SR) designed to provide sub-50ms recovery from link or node failures in IP/MPLS networks. Unlike traditional LFA, which relies on specific topological conditions and may not cover all failure scenarios, TI-LFA is “topology-independent,” meaning it ensures protection for all traffic flows regardless of network topology. TI-LFA works by precomputing backup paths based on Segment Routing (SR) policies, allowing traffic to be quickly rerouted through alternate paths without complex recalculations. In the event of a failure, traffic is redirected via pre-established repair paths that adhere to the shortest path routing principles (SPF), minimizing packet loss and maintaining high availability across the network.
In short MPLS Segment Routing (MPLS-SR) is a modern approach to routing in MPLS (Multiprotocol Label Switching) networks. It allows for the efficient steering of traffic through predefined network segments. These segments are advertised by link-state routing protocols (IS-IS, OSPFv2, and OSPFv3) within IGP topologies. With MPLS-SR, path control and traffic engineering can be achieved without the need for protocols like LDP or RSVP-TE, which are typically used to set up traffic-engineered paths in traditional MPLS networks. These segments are stacked as labels in packet headers, allowing routers to follow predefined paths for traffic without this additional state tracking. This simplifies traffic engineering, enhances scalability, and enables efficient routing.
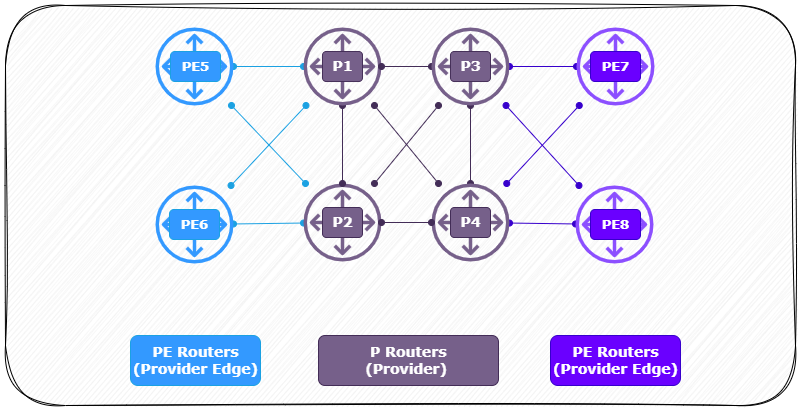
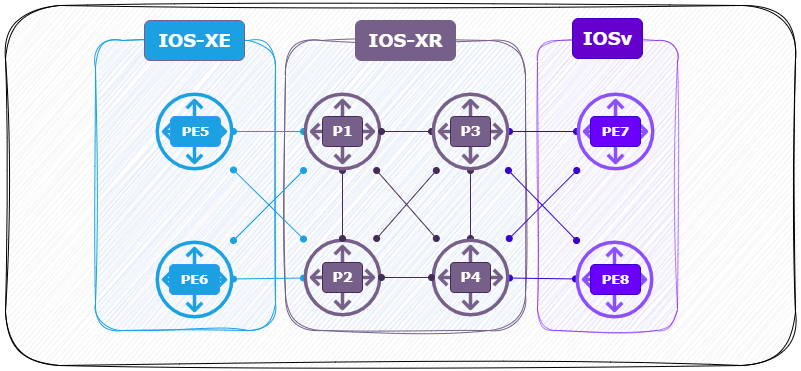
In this lab I will demonstrate the process of migrating from a traditional MPLS setup (using MPLS, OSPF, and LDP) to an MPLS-SR configuration on IOS-XR and IOS-XE. In this guide, you will see the configuration steps required and differences between both operating systems. Following this, I will configure a Segment Routing Mapping Server (SRMS) to map the prefixes of IOSv routers since they don’t support MPLS-SR.
As of Cisco Modeling Labs (CML) version 2.7, the standard IOS-XRv image has limited support and fewer features compared to the newer IOS-XRv 9000 image, which is the preferred option for IOS XR simulations in CML. The IOS-XRv image is not included in the refplat ISO and the only option available after a fresh CML 2.7 install is XRV9K.
The IOS-XRv 9000 image includes more robust MPLS and VRF capabilities, such as successful L3 MPLS VPN implementations, making it a better choice for complex routing scenarios. However, the IOS-XRv image itself remains available with limitations, including a lack of L2 MPLS VPN support in certain scenarios.
XRv vs XRv9K resources
The only challenge with the IOS-XRv 9000 image is that it requires slightly more resources than the IOS-XRv image.
Multiprotocol Label Switching (MPLS) is a data-forwarding technique that uses labels to route packets along predefined paths, rather than traditional IP routing, which relies on layer-3 addresses. By attaching labels to packets, MPLS allows for high-speed data transfers and efficient traffic engineering, making it a go-to for large-scale carrier and enterprise networks.
Segment Routing (SR), is an extension for link-state IGPs (OSPF and IS-IS). Traditional MPLS forms Label Switched Paths (LSPs) through label distribution protocols such as LDP or RSVP-TE. SR simplifies this by eliminating these protocols and allowing source-based routing. In SR, the source node attaches a list of segments (labels) to the packet, guiding it through the desired path without the need for intermediate nodes to compute routing decisions. This shift enables networks to be more adaptable and scalable.
MPLS Traffic Engineering (MPLS-TE) is a technology that enhances the capabilities of MPLS (Multiprotocol Label Switching) to enable more granular control over traffic flow within a network.
Traffic engineering refers to the practice of optimizing the flow of network traffic in a way that ensures efficient use of network resources, avoids congestion, and achieves better overall performance. In traditional IP networks, traffic generally follows the shortest path, which can lead to suboptimal usage of network capacity and congestion. MPLS-TE allows operators to move beyond shortest-path routing by explicitly setting up paths through the network that distribute traffic in a desired way.
In this lab I am going to configure a tunnel to overrule the IGP shortest path and chose a different path.
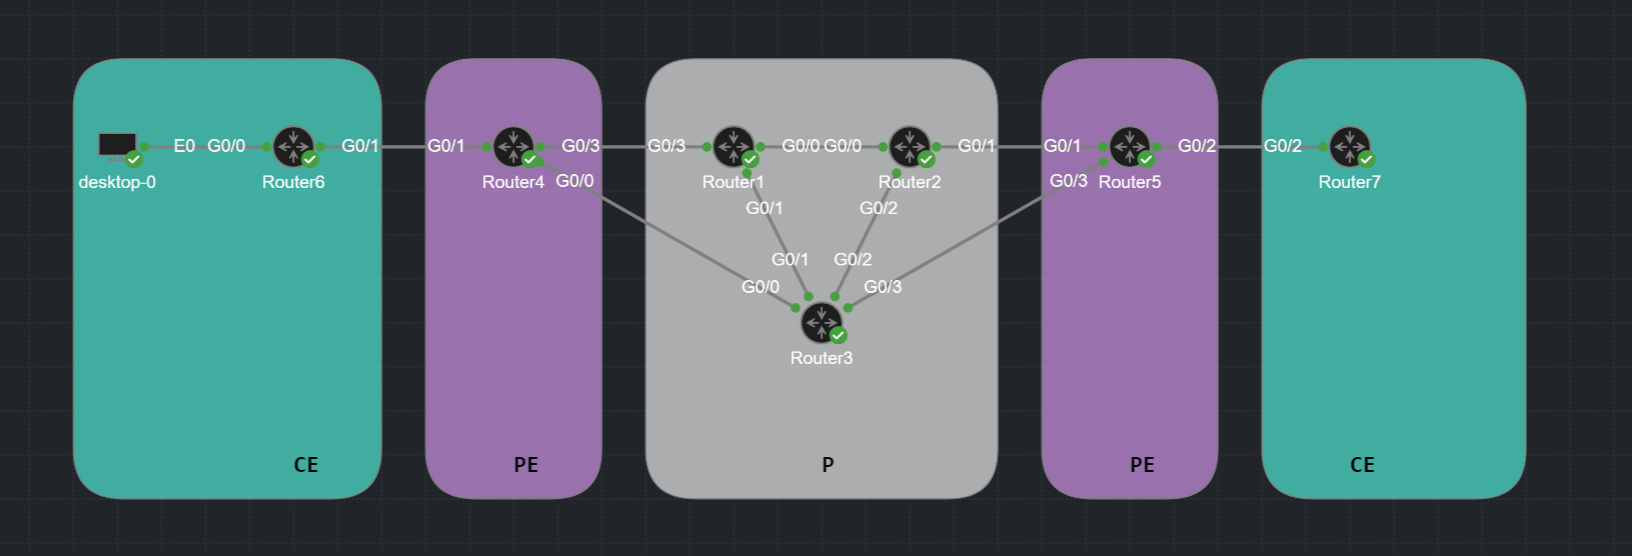
Using Cisco’s Modeling Labs (CML) I build the following MPLS lab using OSPF and LDP neighbor relationships using virtual routers running IOSv.
3 x P routers (Router1, Router2, Router3)
2 x PE router (Router4, Router5)
2 x CE router (Router6, Router7)
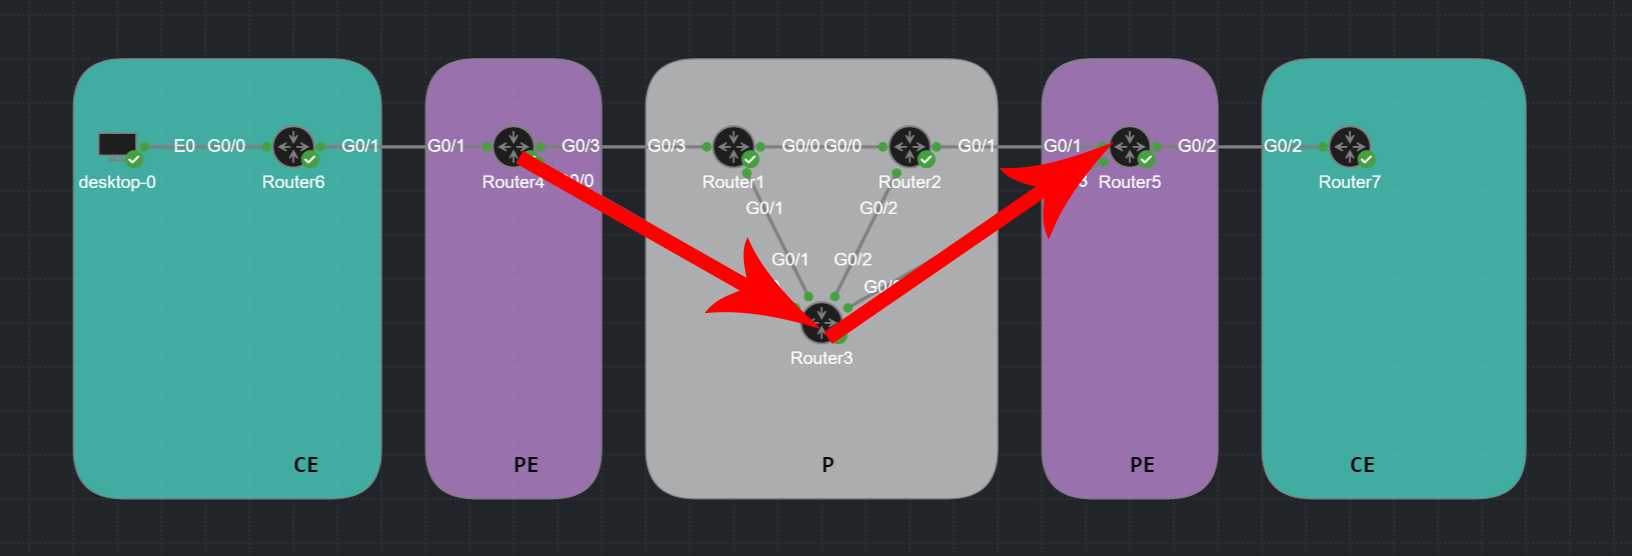
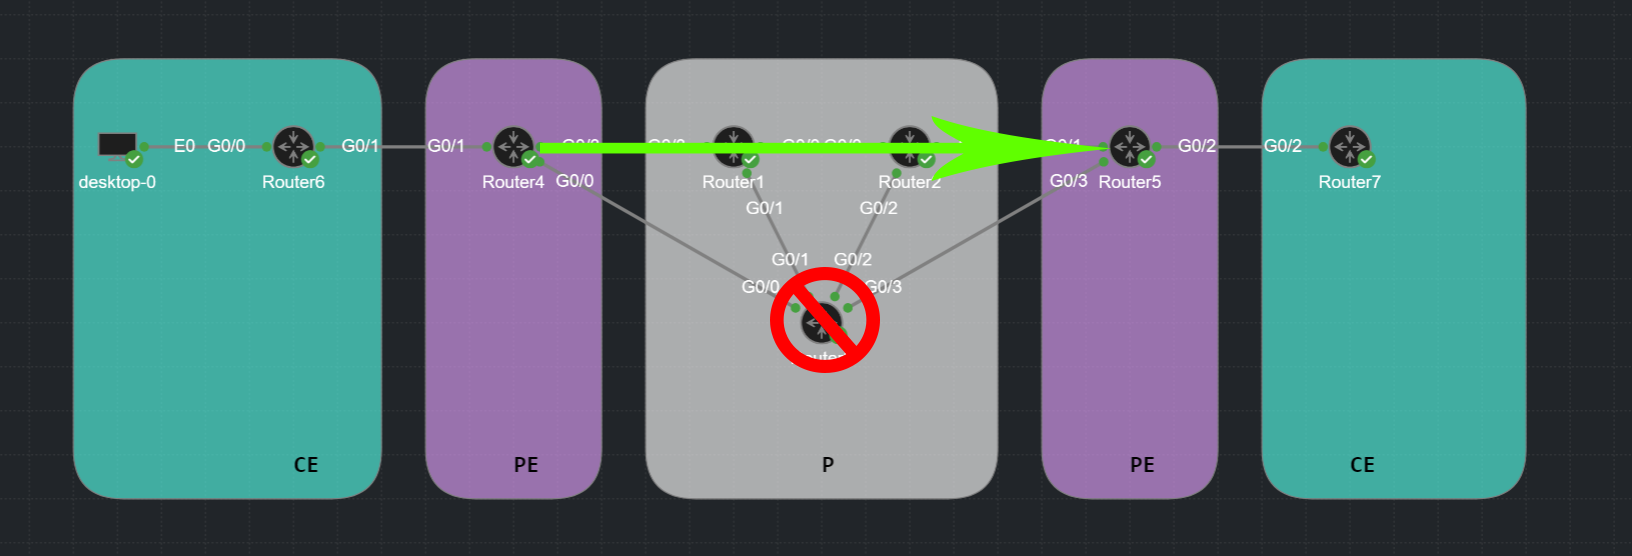
Default Behaviour The default traffic flow behaviour from PE Router4 towards PE Router5 will follow the IGP shortest path via P Router3. This path is one hop instead of traversing via Router1+Router2 being two hops away and double the cost. MPLS-TE With MPLS-TE we can define a different path via Router1+Router2. There can be many reasons why we would want to do this and many ways how we can achieve this. In this Lab I am going to enable MPLS-TE and simply exclude Router3 from our path.
For example the link between Router1 and Router2 gives on Router1: 10.1.2.1/24and on Router2: 10.1.2.2/24.
Verification on Router3 (P):
Router3#sh ip ospf neighborNeighbor ID Pri State Dead Time Address Interface4.4.4.40 FULL/-00:00:3510.3.4.4 GigabitEthernet0/01.1.1.10 FULL/-00:00:3810.1.3.1 GigabitEthernet0/12.2.2.20 FULL/-00:00:3510.2.3.2 GigabitEthernet0/25.5.5.50 FULL/-00:00:3310.3.5.5 GigabitEthernet0/3Router3#sh mpls interfacesInterface IP Tunnel BGP Static OperationalGigabitEthernet0/0 Yes (ldp) No No No YesGigabitEthernet0/1 Yes (ldp) No No No YesGigabitEthernet0/2 Yes (ldp) No No No YesGigabitEthernet0/3 Yes (ldp) No No No YesRouter3#sh mpls ldp neighbor Peer LDP Ident: 5.5.5.5:0; Local LDP Ident 3.3.3.3:0 TCP connection: 5.5.5.5.57381-3.3.3.3.646 State: Oper; Msgs sent/rcvd: 46/45; Downstream Up time: 00:26:54 LDP discovery sources: GigabitEthernet0/3, Src IP addr: 10.3.5.5 Addresses bound to peer LDP Ident:10.2.5.55.5.5.510.3.5.5 Peer LDP Ident: 4.4.4.4:0; Local LDP Ident 3.3.3.3:0 TCP connection: 4.4.4.4.42087-3.3.3.3.646 State: Oper; Msgs sent/rcvd: 44/46; Downstream Up time: 00:26:54 LDP discovery sources: GigabitEthernet0/0, Src IP addr: 10.3.4.4 Addresses bound to peer LDP Ident:10.3.4.44.4.4.410.1.4.4 Peer LDP Ident: 2.2.2.2:0; Local LDP Ident 3.3.3.3:0 TCP connection: 2.2.2.2.646-3.3.3.3.23943 State: Oper; Msgs sent/rcvd: 45/45; Downstream Up time: 00:26:51 LDP discovery sources: GigabitEthernet0/2, Src IP addr: 10.2.3.2 Addresses bound to peer LDP Ident:10.1.2.210.2.5.210.2.3.22.2.2.2 Peer LDP Ident: 1.1.1.1:0; Local LDP Ident 3.3.3.3:0 TCP connection: 1.1.1.1.646-3.3.3.3.22044 State: Oper; Msgs sent/rcvd: 45/45; Downstream Up time: 00:26:51 LDP discovery sources: GigabitEthernet0/1, Src IP addr: 10.1.3.1 Addresses bound to peer LDP Ident:10.1.2.110.1.3.110.1.4.11.1.1.1
Router Configurations
P Routers: (Router1, Router2, Router3)
The P routers are configured with the standard subnetting scheme from the table above in combination with OSPF area 0 and LDP as the labelling protocol. The Label range is based on the Router number.
Router1, Router2, Router2##---- MPLS ranges and LDP#---- Modify label range per routermpls label range 100199mpls label protocol ldpmpls ldp router-id Loopback0 force#---- Interface configuration with MPLS & OSPFinterface Loopback0 ip address 1.1.1.1255.255.255.255 ip ospf 1 area 0!interface GigabitEthernet0/0 ip address 10.1.2.1255.255.255.0 ip ospf network point-to-point ip ospf 1 area 0 mpls ip!interface GigabitEthernet0/1 ip address 10.1.3.1255.255.255.0 ip ospf network point-to-point ip ospf 1 area 0 mpls ip!interface GigabitEthernet0/3 ip address 10.1.4.1255.255.255.0 ip ospf network point-to-point ip ospf 1 area 0 mpls ip!
PE Routers: (Router4, Router5)
The PE routers are configured with the standard subnetting scheme from the table above in combination with OSPF area 0 and LDP as the labelling protocol. Each PE routers has an IBGP session to the other PE router (Router4 <-> Router5) for CE traffic.
Router4 (PE)# ============= MPLSmpls label range 400499mpls label protocol ldpmpls ldp router-id Loopback0 force# ===== Interfaces interface Loopback0 ip address 4.4.4.4255.255.255.255 ip ospf 1 area 0!interface GigabitEthernet0/0 ip address 10.3.4.4255.255.255.0 ip ospf network point-to-point ip ospf 1 area 0 mpls ip!interface GigabitEthernet0/1 ip vrf forwarding CUST ip address 10.4.6.4255.255.255.0!interface GigabitEthernet0/3 ip address 10.1.4.4255.255.255.0 ip ospf network point-to-point ip ospf 1 area 0 mpls ip# ============= OSPFrouter ospf 1 router-id 4.4.4.4!# =========== BGProuter bgp 65000template peer-session IBGP remote-as 65000 transport connection-mode active update-source Loopback0 exit-peer-session ! bgp router-id 4.4.4.4 bgp log-neighbor-changes no bgp default ipv4-unicast neighbor 5.5.5.5 inherit peer-session IBGP neighbor 5.5.5.5 transport connection-mode passive ! address-family ipv4 exit-address-family ! address-family vpnv4 neighbor 5.5.5.5 activate neighbor 5.5.5.5 send-community extended neighbor 5.5.5.5 next-hop-self exit-address-family ! address-family ipv4 vrf CUST neighbor 10.4.6.6 remote-as 65006 neighbor 10.4.6.6 activate neighbor 10.4.6.6 as-override exit-address-family
Router5 (PE)# ============= MPLSmpls label range 500599mpls label protocol ldpmpls ldp router-id Loopback0 force# ===== Interfaces interface Loopback0 ip address 5.5.5.5255.255.255.255 ip ospf 1 area 0!interface GigabitEthernet0/1 ip address 10.2.5.5255.255.255.0 ip ospf network point-to-point ip ospf 1 area 0 mpls ip!interface GigabitEthernet0/2 ip vrf forwarding CUST ip address 10.5.7.5255.255.255.0!interface GigabitEthernet0/3 ip address 10.3.5.5255.255.255.0 ip ospf network point-to-point ip ospf 1 area 0 mpls ip# ============= OSPFrouter ospf 1 router-id 5.5.5.5!# =========== BGProuter bgp 65000template peer-session IBGP remote-as 65000 transport connection-mode active update-source Loopback0 exit-peer-session ! bgp router-id 5.5.5.5 bgp log-neighbor-changes no bgp default ipv4-unicast neighbor 4.4.4.4 inherit peer-session IBGP ! address-family ipv4 exit-address-family ! address-family vpnv4 neighbor 4.4.4.4 activate neighbor 4.4.4.4 send-community extended neighbor 4.4.4.4 next-hop-self exit-address-family ! address-family ipv4 vrf CUST neighbor 10.5.7.7 remote-as 65006 neighbor 10.5.7.7 activate neighbor 10.5.7.7 as-override exit-address-family
Traceroute between CE routers before TE (R6->R7)
When performing a traceroute between CE routers we see the default IGP shortest path behaviour. R6 -> R4 -> R3 -> R5 -> R7. After MPLS-TE we will have created the following path: R6 -> R4 -> R1 -> R2 -> R5 -> R7.